Showing posts with label Tomato. Show all posts

Monday, 1 June 2015

Roast Tomato Soup with Grilled Cheddar Cheese and Caramelized Red Onion Sandwich.


I bring you this dish on a cold, blustery day in Cornwall but, while it warms me up nicely as I take a scoop from my bowl and hear the chilly, breeze blowing outside, if you are fortunate enough to be having a sunnier and warmer 1st of June than myself then please still feel free to devour this lovely soup and enjoy it's vibrant, refreshing, summery flavours. 

Never will I eat tomato soup without a grilled cheese again. The crisp, golden bread encasing an ocean of melted cheddar and sweet, caramelized red onions is the perfect accompaniment to dunk into this wonderful soup and quite frankly the perfect food to eat at any moment when hunger strikes; breakfast, dinner, tea... and again for dessert. It is scrumptious! Taking the typical cheese toastie I've always had growing up, the American's thought why not go one better and smother this in butter and fry it until crunchy and glorious? Boy am I glad they did. Add in a yummy roast tomato soup drizzled with pesto oil, scattered with molten mozzarella and topped with a vine of sweet, juicy cherry tomatoes and you've got yourself a pretty damn delicious dinner.

Ingredients
Makes 4 BIG bowls of soup and 4 gorgeous grilled cheeses.
For the Roast Tomato Soup:
12 salad tomatoes, halved
A pinch of caster sugar
6 tbsp. olive oil plus extra to drizzle
50g unsalted butter
2 each of onions, carrots and garlic cloves, chopped fairly small
2 tbsp. tomato puree
400g tin of chopped tomatoes
1 bay leaf
1 basil sprig plus 12 leaves to prepare the basil oil
1 litre vegetable stock
4 clusters of vine-ripened cherry tomatoes
12 mini mozzarella balls/pearls
For the Grilled Cheddar Cheese and Caramelized Red Onion Sandwiches:
1 large red onion, sliced
1 tsp. olive oil
A good sprinkling of dark brown sugar
A good glug of balsamic vinegar
8 slices of thick white bread
A hefty pile of grated mature cheddar cheese
Unsalted butter, softened

Method

1.    Preheat the oven to 180°C. Place the salad tomatoes, cut-side up, onto a baking tray and sprinkle with sugar, drizzle with olive oil and season. Roast for 40 minutes until nice and softened.

2.    Meanwhile, heat the butter and 1 tbsp. olive oil in a pan over a medium heat and cook the onion, carrot and garlic, stirring for 5 minutes until softened. Add the tinned tomatoes, tomato puree, bay leaf, basil sprig, vegetable stock, roasted salad tomatoes and any cooking juices. Bring to the boil and then reduce the heat to low and simmer, stirring occasionally, for 20-25 minutes until the vegetables are lovely and tender.

4.    Discard the basil sprig, cool slightly and then blend the soup in batches. Return to the saucepan and cook over a low heat, stirring until warmed through. 

5.   While you warm through the soup, take your vine ripened cherry tomatoes, place them into a baking dish, drizzle lightly with olive oil and roast in the oven for about 15-20 minutes until softened and lightly charred.

6.   Next, place 5 tbsp. olive oil into a blender with 12 large basil leaves and blitz to make your basil oil. 

7.   You can now prepare your grilled cheese sandwiches. I apologize for the vagueness of my ingredients list here but, this is because with a grilled cheese you can't really go wrong with how you prepare it; what ingredients you put in it or how much of each ingredient you use. It's entirely up to you! To prepare my caramelized red onion I add the sliced red onion to a saucepan, fry it until softened in 1 tsp. olive oil, then add a sprinkling of dark brown sugar, stirring until the onion becomes caramelized, add in a splash of balsamic vinegar and continue to cook until the onion is lovely, glossy and sticky.

8.   I then like to take two pieces of chunky, white tiger bread, scatter one piece with a large pile of grated mature cheddar cheese (please feel free to use whatever cheese you like though e.g. goats cheese, edam, swiss cheese, blue cheese and as much as you like!), scatter on some caramelized red onions, place the other round of bread on top and squash down a little to help the sandwich hold together when you're flipping it in the pan. 

9.   Next, heat a drizzle of olive oil in a frying pan over a medium heat, spread a layer of butter on top of your sandwich and place it butter side down into the hot frying pan, leaving to fry for a few minutes until lovely, crisp and golden. Once ready to flip, spread another layer of butter on the uncooked side of the sandwich and flip, leaving for a few minutes again until crunchy and bronze. Grate a little more cheese on the top side and keep flipping until both sides are bronze and crunchy and the cheese in the center is completely melted.  

10.  Now scoop the warm soup into bowls, place three mozzarella balls into each and allow to melt in the hot soup, drizzle with a swirl of basil oil and pop a vine of the roasted cherry tomatoes on top. Finally, cut your crunchy grilled cheese in half and watch as a waterfall of golden cheese oozes out. Last of all, whether your snuggled up on your sofa in a blanket or sunbathing outside on a deckchair, sit back and enjoy!


Wednesday, 24 September 2014

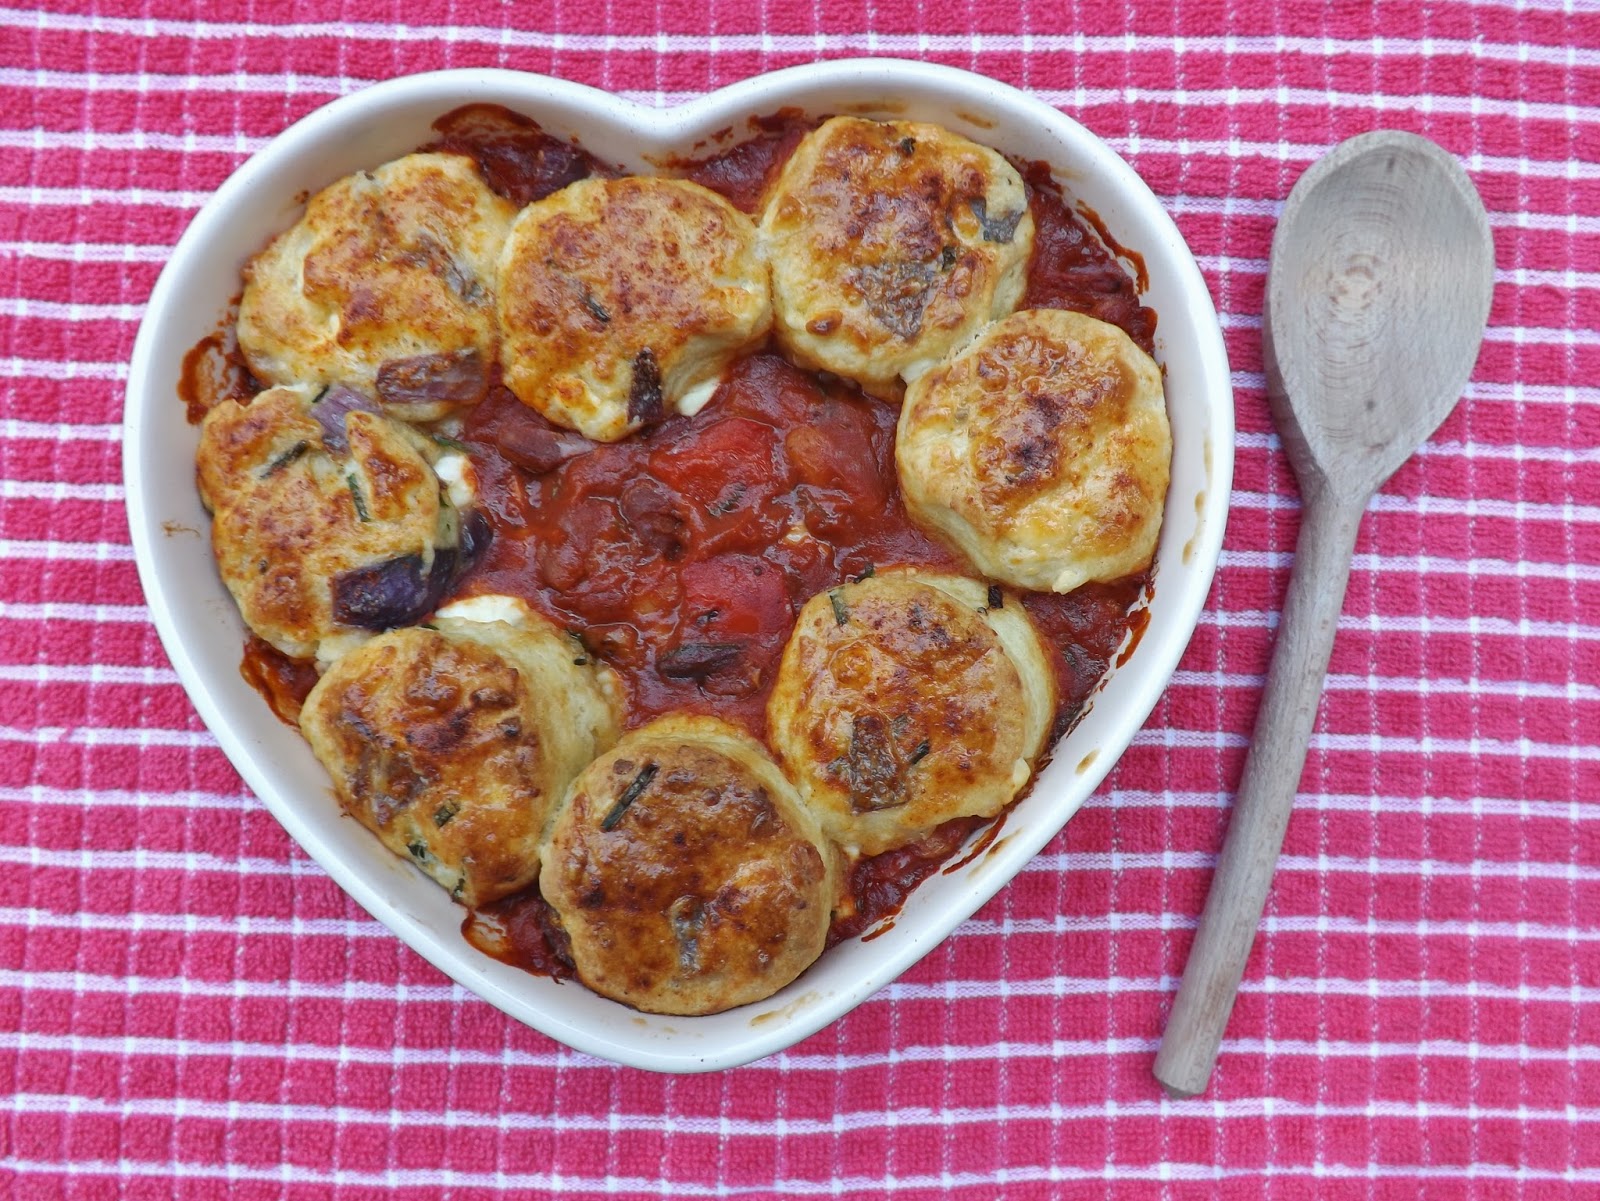
Veggie Sausage Casserole with Feta, Chive and Red Onion Scones.


As much as I would love to cling on to the warm, sunny days of summer for at least a little while longer, the dark nights are beginning to roll in earlier and the breeze in the air is becoming all the more chilly so, it is almost impossible to deny that Autumn is now well and truly arriving. Luckily, despite the wind and rain that Autumn will surely bring with it, it will also bring a whole array of delicious, warming, hearty dishes to tuck into on any cold September, October or November evening and I for one, cannot wait to munch on every stew, hot pot, cobbler and crumble Autumn has to offer. 

For me, this gorgeous veggie sausage casserole has just become my go to meal for Autumn and I can't quite believe just how delicious it turned out. The casserole is full of rich, earthy flavors and vibrant, colorful vegetables and the feta, chive and red onion scones, oh these scones, are utterly unbelievable! Soft, light and fluffy and the perfect accompaniment to the tomato base of the casserole as it creates a really wonderful Mediterranean feel to the dish with the combination of tomatoes, red onion, feta and basil. It was honestly delicious and looking back on the pictures now, I could just munch on it all over again and next week I probably will!

Recipe
Serves 2-4
For the Veggie Sausage Casserole-
1 tbsp. olive oil
1 small red onion, finely chopped
1/2 yellow pepper, chopped into small chunks
1/2 red pepper, chopped into small chunks
1 fat clove of garlic
2 Quorn sausages
2 Quorn Chorizo sausages (you can get these from Sainsbury's or just use whichever vegetarian sausages you like. I think Linda McCartney's Italian sausages would be delicious in this dish if you can get them)
3/4 tsp. smoked paprika
1/4 tsp. ground cumin
65ml vegetable stock
1x 400g tin chopped tomatoes
200g mixed beans (I used a tin of mixed beans in a chilli sauce and they added lots of flavour!)
fresh basil
fresh chives
For the Feta, Chive and Red Onion Scones-
195g plain flour
1/2 tbsp. caster sugar
1 1/4 tsp. baking powder
1/4 tsp. bicarbonate of soda
pinch of salt
pinch of pepper
85g unsalted butter
1/2 egg, beaten
95ml whole milk
110g feta, crumbled
chopped chives
1/2 a small red onion, finely chopped
1 tsp. olive oil
1/2 an egg, beaten for glazing
smoked paprika for topping

Method

1. Start by preparing the scone mixture. In a mixing bowl, sift together the flour, baking powder, bicarbonate of soda, salt and black pepper. Stir in the sugar. Add the butter and rub in to the flour mixture until the mixture resembles fine breadcrumbs.

2. In another bowl, combine the egg and whole milk and beat lightly with a fork. (Start, by beating a whole egg and reserve half of the egg for glazing the scones when finished and use the remaining half an egg to whisk with the milk and add to the scone dough). Add the egg and milk mixture to the flour mixture and stir to make a soft, shaggy dough. Meanwhile, fry the red onion in 1 tsp. olive oil until softened.

3. Add the snipped chives, crumbled feta and fried red onion to the scone dough, tip out onto the work-surface and knead together. 

4. Roll or pat out the scone dough and cut out 8 or so small scones using a small round biscuit cutter. Set aside.

5. Next, prepare the sausage casserole. Pre-heat the oven to 180C. Heat the olive oil in a large pan. Add the onion and cook for about 5 minutes until softened. Add the celery and peppers and cook for 5 minutes more.

6. Chop the sausages into fairly chunky pieces and add to the pan. Fry for another 5 minutes and then add in the garlic and spices, cooking for 1-2 minutes until the aromas are released. 

7. Pour in the chopped tomatoes and mixed beans. Add the vegetable stock and stir, bringing to a simmer. Stir through some snipped chives and torn fresh basil.

8. Pour the sausage, bean and vegetable mixture into a casserole dish and arrange the scones on top in whatever pattern you like. You could just do a border like me or cover the top completely with mini scones. Brush the top of each scone with the reserved beaten egg from earlier and sprinkle with some smoked paprika.

9. Pop in the oven for about 20-25 minutes until the scones are bronze, fluffy and risen. Take out and enjoy!

Thursday, 19 June 2014

Onion Bhaji Burger and Homemade Chips.


7 years ago my 13 year old self decided to stop eating meat and now I couldn't imagine anything different. I love cooking veggie food and I try my best to make unique tasty dishes which, you often can't get as a vegetarian when you go to restaurants or buy foods in supermarkets as the choice is more limited. Last weekend I decided to make these quirky and yummy onion bhaji burgers which, I served with the Hairy Biker's special homemade chip recipe and rest assured that Si and Dave certainly know what they're doing when it comes to making chips as these chips are delicious. Deep fried chips and deep fried onion bhaji's, so obviously not the healthiest of meals I've ever made. Come to think of it, do I ever really make healthy meals? Nevermind though, a little bit of what you fancy does you good is what my Nan always says so, if you do fancy giving these onion bhaji burgers a go, please do and let me know what you think!

Recipe

Serves 4
For the Onion Bhaji Burgers-
For the Onion Bhajis-
2 red onions, one finely chopped and one thinly sliced
100g gram flour (chickpea flour)
1/2 tsp. baking powder
2 tsp. curry paste (I used Tesco finest Goan Massala paste which was very yummy but, it is a mild coconut flavoured paste so feel free to use a spicier curry paste like rogan josh or madras if you'd prefer a kick)
1 red chilli, deseeded and finely chopped
For the Garlic, Mint and Cucumber Raita-
150g natural yoghurt
2 tbsp. chopped mint
1 small garlic clove, crushed
8 slices of cucumber, each cut into 8

Mango Chutney

1 Beef tomato, sliced
Iceberg Lettuce, chopped
White english muffins  

For the Chips-

4 large Maris Piper potatoes
sea salt

Method


1. Start by preparing the chips. Peel the potatoes and cut lengthways into roughly 1cm thick slices. Cut each slice into fairly thick chips and rinse in a colander under plenty of cold water to remove excess starch. (If you have time, it's worth letting the chips soak in a bowl of cold water for several hours, or overnight.) 


2. After soaking, pat the chips dry with kitchen paper. Heat an electric deep-fat fryer to 130C. Using a large, metal, slotted spoon, gently lower half the chips into the hot oil and stir carefully. Fry for ten minutes, or until cooked through but not browned.


3. Remove the chips from the pan with a slotted spoon and set aside to drain on plenty of kitchen paper. Repeat the process with the remaining chips and set aside. (The chips can be left for several hours at this stage.)


4. Next, mix together the raita ingredients with a little salt and pepper, then spoon into a small bowl. Refrigerate until needed.


5. Prepare the onion bhajis. Sift the flour and baking powder into a bowl. Add the curry paste, chopped chilli and a good sprinkling of salt. Add about 80-100ml of cold water to make a thick batter. Stir in the chopped and sliced onions until they are well coated.


6. When the onion bhaji batter is prepared, heat the oil in the deep-fat fryer to 180C. Add heaped tbsps of onion mix to the pan, a few at a time, and cook for a few mins, turning once, until they are evenly browned and crisp, about 3-4 mins. Drain on kitchen paper and keep warm while you cook the remaining bhajis.


7. Once all of the bhajis are prepared, finish cooking the chips. Increase the temperature of the deep-fat fryer to 190C. With a slotted spoon, lower all the par-cooked chips gently into the pan and cook for 4-5 minutes, or until crisp and golden-brown. Remove from the pan with a slotted spoon and drain on kitchen paper. Tip into a serving dish and sprinkle with salt to serve.


8. Finish by assembling the onion bhaji burgers. Halve and lightly toast the english muffins. Spread one half with mango chutney and one half with the raita. Place lettuce and tomato on top of one of the halves of each muffin. Add the onion bhaji (or two bhajis if they are quite small), place the lid on and hold together with a cocktail stick. Serve alongside the chips and enjoy!


Wednesday, 11 June 2014

Homemade Nachos.


Last week I decided to branch away from the old mixing bowl and cupcake tin to make some homemade nachos which, are something I've never made before but, they are now something I will be making time and time again. I love nachos and they are actually one of my favourite foods so I thought I would try making them from scratch and they are honestly completely delicious! Crispy tortilla chips smothered in melted cheese, refreshing salsa, cool sour cream and tangy guacamole. They are perfect! Not so good for the old waistline but, the best food never is. The diet starts tomorrow I promise... unless there's another giant bowl of homemade nachos on offer again! There are lots of components to the dish but, none of them actually take very long to make so if you do have the time and you are a big nacho fan, give these nachos a go and I really hope you enjoy them!

Recipe
Serves 3-4
For the Salsa-
6 medium tomatoes, peeled and finely chopped
1/2 medium red onion, very finely chopped
1 small garlic clove, crushed
Small splash of white wine vinegar
Squeeze of lime juice
Handful of fresh coriander, roughly chopped
Salt and pepper to taste
For the Guacamole-
1/2 large ripe tomato
2 small avocados, very ripe but not bruised
juice 1/2 large lime
small handful coriander, roughly chopped
1/2 red onion, finely chopped
1/2 red chilli, deseeded and finely chopped
For the Sour Cream and Chive Dip-
5 tbsp. sour cream
4 tbsp. chopped chives
2 tsp. lemon juice
Pinch of salt
For the Tortilla Chips-
4 Flour tortillas
Vegetable oil
A hefty noggin of cheese

Method

1.First, prepare the salsa. Combine all of the ingredients in a bowl, stir. Refrigerate until ready to use. To peel the tomatoes; make slits all over the tomatoes, place in a bowl and cover with boiled water. Leave for 2-3 mins and then peel.

2. Next, prepare the guacamole. Use a large knife to pulverize the tomato on a chopping board, then tip into a bowl. Halve and stone the avocados (saving the stones) and use a spoon to scoop out the flesh and add to the bowl with the tomato. Tip all of the other ingredients into the bowl, then season with salt and pepper. Use a whisk or potato masher to roughly mash everything together. Sit the stones in the guacamole to stop it going brown, cover with cling film and chill until needed.

3. To make the sour cream and chive dip; mix all of the ingredients together in a bowl and refrigerate.

4. Next, prepare the tortilla chips. Take the 4 tortilla wraps and use scissors to cut each into 3 strips of equal thickness, then snip into triangles and other fairly large shapes ready for frying. Heat your deep fat fryer to 190°C or heat oil in a large pan. When heated to the correct temperature, start to add 4-6 tortilla chips to the deep fat fryer at a time and turn until bronze and crispy. If using a pan to cook, test the oil with a small piece of tortilla wrap to see when the oil is hot enough for frying. Use a slotted spoon to remove the tortilla chips from the oil and place on to a kitchen towel on a plate to drain off some of the oil. You can sprinkle and season with salt if you like but, it isn't essential. 

5. Finally, when all of the tortilla chips are cooked, take a large dish or casserole bowl and place a layer of tortilla chips into the bottom, scatter with grated cheese and melt under the grill. Place another layer of tortilla chips on top, scatter with cheese and some tomato salsa and melt the cheese under the grill again. Place a final tortilla chip layer on top and scatter with salsa and cheese, melt the cheese under the grill one last time and spoon a large scoop of sour cream, salsa and guacamole onto the top of the nacho stack.

Then most importantly...Tuck in! Devour! Indulge! And don't you dare leave a single crumb!
Enjoy the rest of your week everyone!